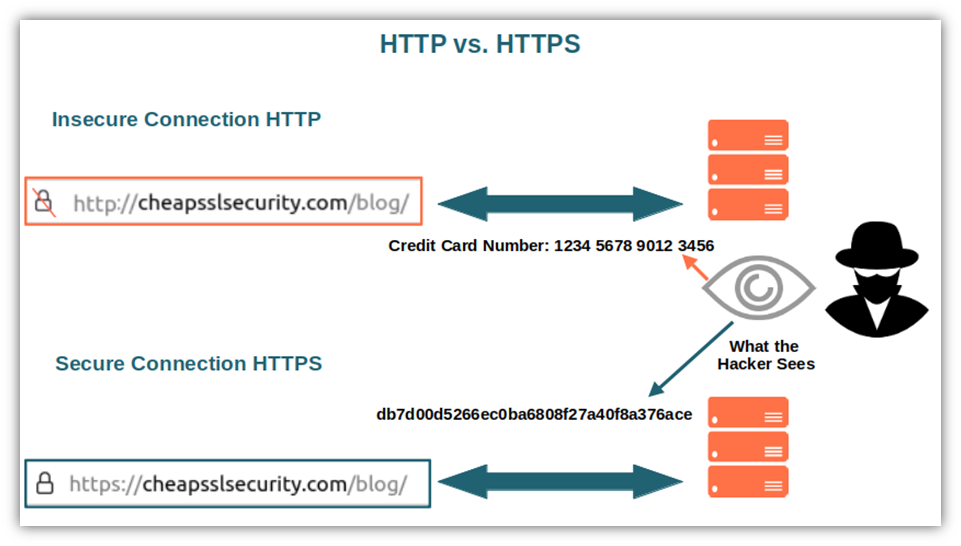
지금까지 Django 와 React.js with Vite.js 로 작성한 내용을 우분투 서버의 서비스로 등록을 완료하고, Nginx 로 배포하는 작업까지 진행하였습니다. Nginx 기본값은 Http:// 주소를 사용 합니다. 하지만 보안등 여러 측면에서 Https:// 주소를 사용할 필요성이 큰 만큼 이번 기회에 Https:// 로 배포하는 방법을 알아 보겠습니다. 전체적인 과정은 Securely Deploy a Django App With Gunicorn, Nginx, & HTTPS 를 참고하면 됩니다.
기본설정
SSL Port
http:// 주소는 80번 포트를 통해서 서비스를 제공 합니다. 반면 https:// 주소는 443번 포트를 통해서 서비스를 제공합니다. 때문에 서버의 443 번 포트가 추가로 열려 있어야 됩니다. 해당 포트가 열려있지 않은 경우에는 사이트 응답시간이 무한으로 오래 걸립니다.
Django Setting
Django 설정에서 SSL을 인식하도록 옵션값을 추가 합니다. 그리고 ALLOWED_HOSTS 와 CSRF_TRUSTED_ORIGINS 주소를 입할 때에도, SSL 을 발급받은 주소 이름과 동일한 이름을 입력 합니다.
# https://docs.djangoproject.com/en/4.2/ref/settings/#secure-proxy-ssl-header
SECURE_SSL_REDIRECT = True
ALLOWED_HOSTS = [
  <도메인.이름>
]
CSRF_TRUSTED_ORIGINS = [
  'http://<도메인.이름>',
  'https://<도메인.이름>',
]
Certbot
Certbot 설치 및 실행
certbot-nginx 는 파이썬으로 만들어진 패키지로 SSL 보안에 필요한 도구를 설치하고 설정값을 수정하는 과정까지 모두 자동으로 진행 됩니다.
SSL 인증서를 발급 받을 때, 도메인 주소 가 필요한데 별도로 입력하지 않으면 Nginx 설정값일 확인하고 server name 에 입력한 값을 가져와서 자동으로 실행 합니다. 때문에 이미 nginx 가 원활하게 작동하고 있다면 별다른 옵션 값 추가 없이 아래의 명령을 실행하면 됩니다.
$ sudo snap install certbot --classic
$ sudo certbot --nginx
$ sudo certbot --nginx -d <도메인.주소>

Successfully received certificate.
Certificate is saved at: /etc/letsencrypt/live/<도메인.주소>/fullchain.pem
Key is saved at:         /etc/letsencrypt/live/<도메인.주소>/privkey.pem
This certificate expires on 2023-08-02.
만약 다음과 같은 오류 를 출력하면 추가로 필요한 의존성 모듈을 설치 하여야 합니다.
$ sudo certbot --nginx certonly
Saving debug log to /var/log/letsencrypt/letsencrypt.log
Could not choose appropriate plugin: The requested nginx plugin does not appear to be installed
The requested nginx plugin does not appear to be installed

$ sudo apt-get install python3-certbot-nginx
Nginx Setting
작업을 마치면, Nginx 에서도 SSL 인증서를 활용할 수 있도록 해야 됩니다. 하지만 certbot 에서 자동으로 필요한 내용을 추가했기 때문에 어떠한 내용이 추가되었는지 확인만 하고 넘어가겠습니다. 주석에 # managed by Certbot 가 붙어있는 부분이 자동으로 설정값을 추가한 내용 입니다.
server {
	server_name 도메인.이름;

  listen [::]:443 ssl ipv6only=on; # managed by Certbot
  listen 443 ssl; # managed by Certbot
  ssl_certificate /etc/letsencrypt/live/도메인.이름/fullchain.pem; # managed by Certbot
  ssl_certificate_key /etc/letsencrypt/live/도메인.이름/privkey.pem; # managed by Certbot
  include /etc/letsencrypt/options-ssl-nginx.conf; # managed by Certbot
  ssl_dhparam /etc/letsencrypt/ssl-dhparams.pem; # managed by Certbot
}

server {
    if ($host = 도메인.이름) {
        return 301 https://$host$request_uri;
    } # managed by Certbot
	listen 80 default_server;
	listen [::]:80 default_server;
	server_name 도메인.이름;
    return 404; # managed by Certbot
}
SSL 인증서 발급내용 확인
SSLShopper 사이트에서 발급내용을 확인할 수 있습니다.
https://www.sslshopper.com/ssl-checker.html?hostname=도메인.이름
접속확인
443 번 포트 개방여부를 확인 (안 열려 있는경우 무한로딩 상태), Django Allowed host & CSRF 설정값 확인 (문제가 있는 경우, 400 Bad Request 메세지를 Nginx 에서 출력), Nginx 정상동작 확인을 거치고 나면 이제 정상적으로 서비스를 하는것을 확이할 수 있습니다. 기존의 http://:80 주소를 입력하면 Nginx 에서 자동으로 Http://443 주소값으로 자동으로 Re-direct 합니다.
인증서 정보확인
https:\\ 주소로 접속되고 있으면 브라우저를 통해 인증서 내용을 확인할 수 있습니다. 서버에 접속한 상태에서도 동일한 정보를 확인할 수 있고, 터미널에서 갱신작업을 완료한 뒤, 해당 인증서 유효기간이 연장되었는지를 확인하는데 유용 합니다.
$ sudo certbot certificates
Saving debug log to /var/log/letsencrypt/letsencrypt.log
- - - - - - - - - - - - - - - - - - - - - - - - - - - - - - - - - - - - - - - -
Found the following certs:
  Certificate Name: <도메인.이름>
    Expiry Date: 2023-08-02 00:54:49+00:00 (VALID: 89 days)
    Certificate Path: /etc/letsencrypt/live/<도메인.이름>/fullchain.pem
    Private Key Path: /etc/letsencrypt/live/<도메인.이름>/privkey.pem
인증서 갱신 테스트
Certbot 에서 발급한 인증서는 3달의 유효기간 을 갖습니다. 해당절차 진행시 이메일 주소를 입력하면 해당 주소의 인증서가 만료될 때 안네 메일을 보내주고 이를 확인하여 갱신 작업을 진행하면 됩니다.
갱신작업을 할 때 --dry-run 옵션을 추가하면, 실제 작업을 진행하지 않고 갱신 작업이 가능한지 여부를 미리 확인할 수 있습니다. 아래와 같이 (success) 메세지를 출력하는지 확인 합니다. 만약 문제가 발생하였다면 해당 문제의 원인을 미리 해결해야 갱신 작업이 원활하게 진행될 수 있습니다.
$ sudo certbot renew --dry-run
Saving debug log to /var/log/letsencrypt/letsencrypt.log
- - - - - - - - - - - - - - - - - - - - - - - - - - - - - - - - - - - - - - - -
Processing /etc/letsencrypt/renewal/<도메인.주소>.conf
Congratulations, all simulated renewals succeeded:
  /etc/letsencrypt/live/<도메인.주소>/fullchain.pem (success)
certificates are not due for renewal yet
90일 주기로 인증서 갱신 작업을 해야 하는데, 만료되기 2주 전부터 갱신 작업이 가능합니다. 갱신작업 가능기간 이전에 실행을 하면 아래와 같은 메세지를 출력 합니다.
$ sudo certbot renew
$ sudo certbot renew -n -q
Saving debug log to /var/log/letsencrypt/letsencrypt.log
- - - - - - - - - - - - - - - - - - - - - - - - - - - - - - - - - - - - - - - -
The following certificates are not due for renewal yet:
  /etc/letsencrypt/live/mrmarket.kr/fullchain.pem expires on 2023-08-02 (skipped)
No renewals were attempted.
- - - - - - - - - - - - - - - - - - - - - - - - - - - - - - - - - - - - - - - -
유효기간을 연장할려면 앞의 --dry-run 옵션을 제외하고 실행을 합니다.
$ sudo certbot renew
인증서 관련작업 과정을 기록한 로그파일을 확인합니다. sudo nvim /var/log/letsencrypt/letsencrypt.log 를 실행하면 그동안 작업한 내용을 확인 할 수 있습니다.
$ sudo cat /var/log/letsencrypt/letsencrypt.log
2023-05-06 DEBUG: Starting new HTTP connection
2023-05-06 DEBUG: http://r3.o.lencr.org:80 "POST / HTTP/1.1" 200 503
우분투 추가작업
인증서 갱신작업 Crontab 등록하기

매주 일요일 오전 6시에 갱신 작업을 실행하는 스크립트 입니다. 0 6 * * 0 스케줄을 정의하는 부분이 애매할 수 있는데, 스크립트 내용을 문장으로 완성해주는 crontab guru 를 활용 합니다.
$ crontab -e
# 0 5 * * 1 tar -zcf /var/backups/home.tgz /home/
0 6 * * 0 certbot renew -n -q

$ crontab -l
Auto Renew
우분투 서버에서 현재 실행중인 타이머를 확인 합니다. $ systemctl list-timers 를 실행하면 snap.certbot.renew.timer 와 snap.certbot.renew.service 2개의 서비스가 연동되어 실행되는 것을 알 수 있습니다.
$ systemctl list-timers
NEXT/LEFT  LAST  PASSED   UNIT                       ACTIVATE
Sat 23-05-06 KST 7h ago   snap.certbot.renew.timer   snap.certbot.renew.service
Sat 23-05-06 KST 13h ago  dpkg-db-backup.timer       dpkg-db-backup.service
...
14 timers listed.
Pass --all to see loaded but inactive timers, too.
snap.certbot.renew.timer 내용을 살펴보면 다음과 같습니다. 하루에 2번 05:27 과 16:55 분에 snap.certbot 이 최신버젼 여부를 확인 합니다.
[Unit]
# Auto-generated, DO NOT EDIT
Description=Timer renew for snap application certbot.renew
Requires=snap-certbot-2913.mount
After=snap-certbot-2913.mount
X-Snappy=yes

[Timer]
Unit=snap.certbot.renew.service
OnCalendar=*-*-* 05:27
OnCalendar=*-*-* 16:55

[Install]
WantedBy=timers.target
snap.certbot.renew.service 의 내용은 다음과 같습니다. ExecStart=/usr/bin/snap run --timer="00:00~24:00/2" certbot.renew 내용을 보면 snap.certbot.renew.timer 스크립트를 실행하는 것을 알 수 있습니다.
[Unit]
# Auto-generated, DO NOT EDIT
Description=Service for snap application certbot.renew
Requires=snap-certbot-2913.mount
Wants=network.target
After=snap-certbot-2913.mount network.target snapd.apparmor.service
X-Snappy=yes

[Service]
EnvironmentFile=-/etc/environment
ExecStart=/usr/bin/snap run --timer="00:00~24:00/2" certbot.renew
SyslogIdentifier=certbot.renew
Restart=no
WorkingDirectory=/var/snap/certbot/2913
TimeoutStopSec=30
Type=oneshot
NGINX and Secure it Using Certbot 등의 내용에서 설명하는 것을 보면 앞의 CronTab 작업을 추가하지 않아도 하루에 2번씩 갱신작업을 자동으로 하고 있는 것으로 보입니다.
리버스 프록시로 Transmisson Https 실행하기
이 내용은 앞에서 flower 모듈이 5505 포트에서 실행하는 것을 /flower 경로 에서도 동일한 내용을 확인할 수 있도록 작업을 했었던 내용 입니다. Transmission 의 리버스 프록시 관련 Nginx 설정 내용은 링크 내용을 확인후 적용을 하면 큰 문제없이 실행되는 것을 볼 수 있었습니다.
location /transmission/ {
  proxy_read_timeout 300;
  proxy_pass_header  X-Transmission-Session-Id;
  proxy_set_header   X-Forwarded-Host $host;
  proxy_set_header   X-Forwarded-Server $host;
  proxy_set_header   X-Forwarded-For $proxy_add_x_forwarded_for;

  proxy_pass         http://127.0.0.1:9091/transmission/web/;
  }

location /rpc {
  proxy_pass         http://127.0.0.1:9091/transmission/rpc;
}